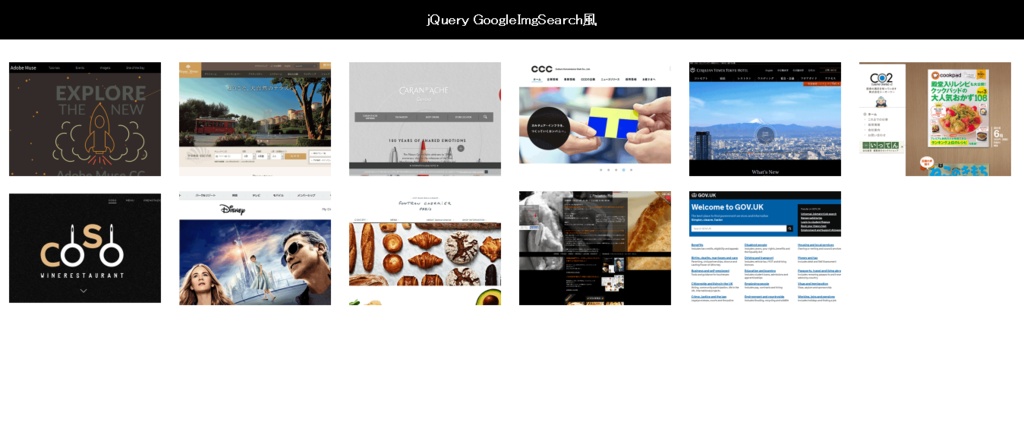
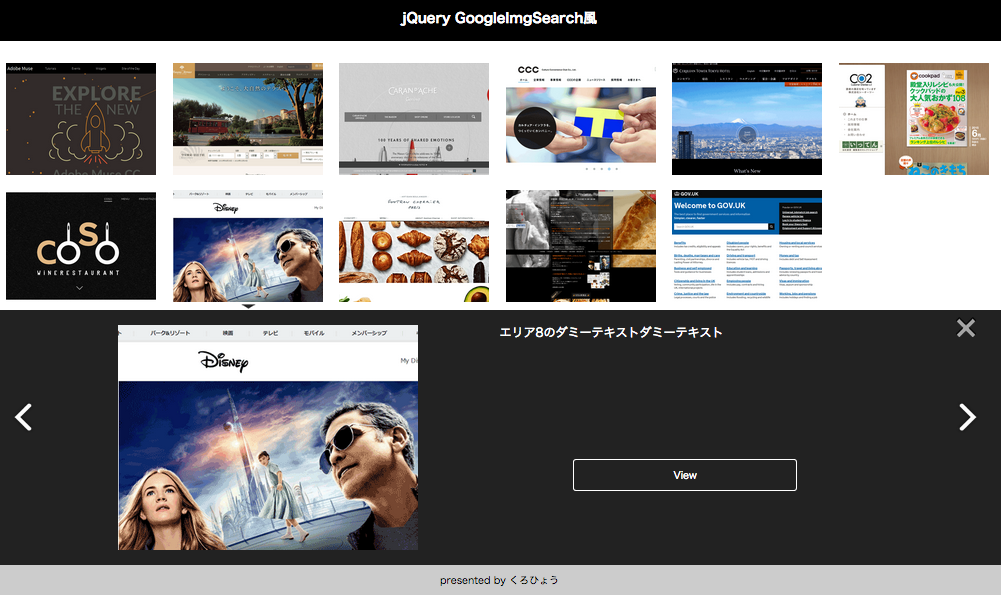
[RWD]Google 画像検索ページ風ギャラリー
本日の授業内容
1.「.htaccess」によるデバイス毎の自動振り分け
*デバイスによって閲覧するページを振り分ける
今回はスマートフォン用(SP)とPC・タブレット用(PC)と2種類作っている
「.htaccess」ファイルによって振り分けるようになっている
「.htaccess」ファイルはMacのデフォルト設定では不可視ファイルのため、最初は「htaccess.txt」をつくる。
サーバーにアップロード後にファイル名&拡張子を変更
htaccess.txt内容
<IfModule mod_rewrite.c>
RewriteEngine On
RewriteCond %{HTTP_USER_AGENT} (iPhone|Android.*Mobile|Windows.*Phone) [NC]
RewriteCond %{QUERY_STRING} !mode=pc
RewriteRule ^$ /pc/sp/ [R,L]

Header set Vary User-Agent
</IfModule>
3行目
RewriteCond %{HTTP_USER_AGENT} (iPhone|Android.*Mobile|Windows.*Phone) [NC]「HTTP_USER_AGENT」は、アクセス端末の種類。
4行目
RewriteCond %{QUERY_STRING} !mode=pcURLの末尾に「?mode=pc」という文字列が付いていた場合には、スマートフォン用ページに移動させない(リダイレクトしない)ようにする記述
5行目
RewriteRule ^$ /pc/sp/ [R,L]
リダイレクト先のアドレス。PC用のトップページ(index.html)からみたサイトルートを書く。
ここはSP用フォルダの位置によって変わるところなので注意が必要
サーバーにアップしたものはこちら↓↓
http://kuropanther.html.xdomain.jp/pc/
(PC用は構築中です。スマホで見てね)
2.Google画像検索ページ風のギャラリーを作成
これを改良してサイト100選を作る予定。
レスポンシブにも対応しています。


サーバーにアップしたものはこちら↓↓
http://kuropanther.html.xdomain.jp/googleimgsearch/
HTML
<!DOCTYPE html>
<html lang="ja">
<head>
<meta charset="UTF-8">
<title></title>
<link rel="stylesheet" href="style.css">
<!--[if lt IE 9]>
<script src="http://html5shiv.googlecode.com/svn/trunk/html5.js"></script>
<script src="http://css3-mediaqueries-js.googlecode.com/svn/trunk/css3-mediaqueries.js"></script>
<![endif]-->
<script src="http://ajax.googleapis.com/ajax/libs/jquery/1.9.1/jquery.min.js"></script>
<script src="js/GoogleImgSearch.js"></script>
</head>
<body>
<header>
<h1>jQuery GoogleImgSearch風</h1>
</header>

<div id="container">
<ul class="listCover">
<li class="listItem">
<img src="img/adobemusecc.png" alt="">
<div class="selfRep">
<div class="selfRepInner">
<div class="secLeft"><img src="img/adobemusecc.png" alt=""></div>
<div class="secRight"><p>エリア1のダミーテキスト エリア1のダミーテキスト エリア1のダミーテキスト エリア1のダミーテキスト</p>
<div class="view">View</div>
</div><!--/.secRight-->
</div><!--/.selfRepInner-->
</div><!--/.selfRep-->
</li><!--/.listItem--><!--
--><li class="listItem">
<img src="img/busenaterrace.png" alt="">
<div class="selfRep">
<div class="selfRepInner">
<div class="secLeft"><img src="img/busenaterrace.png" alt=""></div>
<div class="secRight"><p>エリア2のダミーテキスト エリア2のダミーテキスト エリア2のダミーテキスト エリア2のダミーテキスト</p>
<div class="view">View</div>
</div><!--/.secRight-->
</div><!--/.selfRepInner-->
</div><!--/.selfRep-->
</li>

以下繰り返し

</ul>
</div><!--/#container-->
</body>
</html>
@charset "UTF-8";

html, body, div, h1, p, ul, li, a, img {
  margin: 0;
  padding: 0;
}
img {
  vertical-align: bottom;
  -ms-interpolation-mobile: bicubic;
  border: none;
}

html {
  font-size: 75%;
  -webkit-text-size-adjust: none;
}
a {
  -webkit-tap-highlight-color: transparent;
  text-decoration: none;
}
ul {
  list-style: none;
}
/* HTML5 ELEMENTS */
header,article,aside,section,footer,
nav,menu,details,hgroup,summary {
	display: block;
}
body {
  overflow-y :scroll;
}
*html body {overflow-y: auto;} /* IE6 */
*first-child+html body {overflow-y: auto;} /* IE7 */

h1 {
  background: #000;
  color: #FFF;
  font-size: 18px;
  font-weight: bold;
  text-align: center;
  margin-bottom: 20px;
  padding: 15px 0;
 }
ul.listCover {
  text-align: left;
  margin: 0 auto;
}

 /* .listItem */
ul.listCover li.listItem {
  text-align: center;
  display: inline-block;
  *display: inline;
  *zoom: 1;
  padding: 10px 0;
  cursor: pointer;
}
ul.listCover li.listItem img {
  width: 200px; /*サムネイルの大きさ*/
}
.listCover .active {
  background:url(img/activeArrow.gif) no-repeat bottom center;
}
.listCover .listItem .selfRep {
  display: none;
}
footer{
  background : #CCC;
	height: 40px;
}
footer p{
	text-align: center;
	font-size: 12px;
	padding-top: 10px;
}


/* .expandField */
.expandField {
  width: 100%;
  text-align: left;
  display: block;
  background: #222;
  float: left;
  position: relative;
  overflow: hidden;
  padding: 0;
}
.expandField .btnClose {
  top:10px;
  right: 0;
  width: 60px;
  height: 60px;
  display: block;
  background: url(img/close.png) no-repeat top left;
  position: absolute;
  overflow: hidden;
  cursor: pointer;
}
.expandField .btnPrev {
  top: 120px;
  left: 0;
  width: 60px;
  height: 60px;
  display: block;
  background: url(img/prev.png) no-repeat top left;
  position: absolute;
  overflow: hidden;
  cursor: pointer;
}
.expandField .btnNext {
  top: 120px;
  right: 0;
  width: 60px;
  height: 60px;
  display: block;
  background: url(img/next.png) no-repeat top left;
  position: absolute;
  overflow: hidden;
  cursor: pointer;
}
.expandField .selfRepInner {
  text-align: center;
  position: relative;
  padding: 20px 50px;
}
.expandField .selfRepInner .secLeft,
.expandField .selfRepInner .secRight {
  width : 50%;
  float: left;
}
.expandField .selfRepInner .secLeft {
  text-align: center;
}
.expandField .selfRepInner .secRight {
  text-align: left;
  width: 40%;
  color: #FFF;
}
.secRight p {
  font-size: 16px;
  line-height: 1.2em;
}

.view {
  border: 1px solid white;
  border-radius: 5px;
  padding: 10px 0;
  width: 60%;
  text-align: center;
  margin: 160px auto;
  transition: 0.3s ease-in-out;
}
.view:hover {
  background: #FFF;
  color: #333;
  cursor: pointer;
}


/*  SizeAdjustment */
@media screen and (max-width: 600px){
  .expandField .selfRepInner .secLeft img {
     width :80%;
   }
}
@media screen and (max-width: 480px) {
  .expandField .selfRepInner .secLeft {
     display: none;
   }
   .expandField .selfRepInner .secRight {
     width: 100%;
     Float: none;
   }
}
/* =======================================
	ClearFix
======================================= */
.listCover:before,
.listCover:after,
.expandField .selfRepInner:before,
.expandField .selfRepInner:after {
	content: " ";
	display: table;
}
.listCover:after,
.expandField .selfRepInner:after {clear: both;}
.listCover,
.expandField .selfRepInner {*zoom: 1;}
[サイト制作]ポートフォリオ制作について
今日の先生のお話は主に、レスポンシブwebデザインとポートフォリオ制作のことについてだった。
レスポンシブwebデザイン
- WordPressで会社HPを作った後、更新できないとやめてしまう企業が増えている。WPの全盛期は終わった。
- 一方、スマートフォン対応にする企業は増えている。
- 更新よりもレスポンシブwebデザイン重視にシフトしている。
- Bootstrapは最初からレスポンシブwebデザイン対応。クラスを多用するので、クラスの使い方が重要。
ポートフォリオ制作
- ポートフォリオは、作品集ではない。作品を並べただけではダメ。
- デザイナーを目指すなら、紙媒体のポートフォリオのデザインも重要視される。
あえて使用フォントを書く - 文字サイズと書体選びは重要。
使用してはいけないフォント(使っただけで落とされる?!):
ヒラギノ角ゴ(Mac)など、PCのデフォルトのもの
HG系
創英角ゴ、ポップ体、勘亭流 推奨:
モリサワフォント、オープンタイプフォント、小塚フォント - レイアウトはとても重要!
大きなものはより大きく、小さなものはより小さく。
この差(ジャンプ率)が大きい程カッコよく見える。 - 用紙について。
印刷する紙は裏移りしない紙を使う。両面使用は特に。
175キロ以上の厚いものが良い.
アート紙よりコート紙。
※先日ポートフォリオ用に急いで用意した紙はコート紙だった。でも厚さが足りない!(128g/m)買い直さねば。
サイトマップについて
サイトマップは2種類
[WordPress]記事ページを表示させる
投稿記事が表示されるまで
投稿記事のタイトルをh1で表示する
<h1><?php the_title(); ?></h1>
投稿記事の本文を表示する
<?php if(have_posts()): while(have_posts()):
the_post(); ?>
<h1><?php the_title(); ?></h1>
<?php the_content(); ?>
<?php endwhile; endif; ?>
bodyにクラス名をつける ・・・bodyに自動でクラス名が付く
<body <?php body_class(); ?>>
記事ごとに区別するために、タイトル・本文をarticleタグで囲む
<article>
<?php the_title(); ?>
<?php the_content(); ?>
</article>
<article <?php post_class(); ?>>
スタイルシートをPHPで読み込む
<link rel="stylesheet" href="<?php echo get_stylesheet_uri(); ?>">
カテゴリーを表示させる
<?php the_category( ', ' ); ?>
シングルクォーテーションをカンマで区切るのは、カテゴリーが複数の場合に区切って表示させるため。
これがない場合リストスタイルの表示になる
カテゴリーをspanタグで囲む
<span class="postcat">
<?php the_category( ', ' ); ?>
</span>
日付を表示させる
<time datetime="<?php echo get_the_date( 'Y-m-d' ); ?>">
<?php echo get_the_date(); ?></time>
日付の前に時計のアイコンを表示させる・・・font awesomeのCDNを利用する
<link rel="stylesheet" href="//maxcdn.bootstrapcdn.com/font-awesome/4.3.0/css/font-awesome.min.css">
   中略
<i class="fa fa-clock-o"></i>
CSSを書く

[HTML]
<!DOCTYPE html>
<html lang="ja">
<head>
<meta charset="UTF-8">
<title>ページタイトル</title>
<link rel="stylesheet" href="//maxcdn.bootstrapcdn.com/font-awesome/4.3.0/css/font-awesome.min.css">
<link rel="stylesheet" href="<?php echo get_stylesheet_uri(); ?>">
</head>
<body <?php body_class(); ?>>

<?php if(have_posts()): while(have_posts()):
the_post(); ?>

<article <?php post_class(); ?>>
<h1><?php the_title(); ?></h1>
<div class="postinfo">
<time datetime="<?php echo get_the_date( 'Y-m-d' ); ?>">
<i class="fa fa-clock-o"></i>
<?php echo get_the_date(); ?></time>
<span class="postcat">
<?php the_category( ', ' ); ?>
</span>
</div>

<?php the_content(); ?>
</article>

<?php endwhile; endif; ?>
</body>
</html>
[CSS]
@charset "UTF-8";
/*
Theme Name: My THEME
Author: ***
Description: 2015/6/24作成のテンプレート
Version: 1.0
*/

body{
  font-family:"Hiragino Kaku Gothic ProN",
  Meiryo,
  sans-serif;
}

/*記事*/
article h1{
  font-size: 32px;
  font-weight: normal;
  margin: 0;
}

/*記事の付加情報*/
.postinfo {
  font-size: 14px;
  margin-top: 15px;
}
.postinfo a {
  color: #000;
  text-decoration: none;
}
.postinfo span.postcat{
  margin-left: 20px;
}
.postinfo i{
  color: #888;
}
[WordPress]WPもろもろ
テキストに沿ってWPを作っていく。
記事のインポートの方法
・テキストのサンプルデータで用意されている記事のデータ(posts.xml)を取り込む。
管理画面のツール ⇒ WordPress ⇒ WordPress Importerをインストール ⇒ プラグインを有効化
⇒ 「ファイルを選択する」でposts.xmlを選択 ⇒ ファイルをアップロードしてインポート
その次に表示される画面の1.は任意 ⇒ Download and Import file attachmentsにチェックして「Submit」⇒ 完了したら、投稿一覧に記事があるか確認
style.cssに必要な項目
WordPressがテーマを認識する時に必要な情報を、style.cssの先頭に書く。
/*
Theme Name: MY THEME
Author: TRAVEL SKETCH
Description: This is my original theme.
Version: 1.0
*/
Theme Name :テーマ名
Author :テーマの作者
Description :テーマについての説明
Version :これはなくてもよい
これらはテーマの詳細で表示される

*Dreamweaverとの紐付け方法
[WordPress]
今日の授業のまとめ
WPにはツリー構造がある
テンプレート階層 - WordPress Codex 日本語版
WPのバックアップ方法
①エクスポート機能
「すべてのコンテンツ」を選択すると、記事などがXMLファイルで書き出される。
そのファイルをインポートすれば同じ状態に戻せる。
デメリット:データベースと画像はエクスポートされない
②DBのエクスポート
実際の運用レベルで使う方法
③プラグインを使ったエクスポート
プラグインで検索すれば多数ある。データベースもバックアップできるものもある
④wp_contentフォルダのコピー
授業ではこれがベスト。他のPCに移し替える場合、同じデータベース名にしてフォルダをコピーすればよい
WPがHTMLと違うところ
ほとんどのWPのテーマは、header.php/ index.php / footer.phpと分かれている。
header.phpには、通常のHTMLの<header>の記述をする。
[CSS3]animationで背景色を変化させる
昨日の授業の復習。
CSS3のanimationで背景色を変化させる
画像はPhotoshopで用意。文字や太陽のシェイプの部分をくり抜き、
背景色が見えるようにする.

サーバーにアップしたのはこのアドレスから見られます
http://webtre.ikidane.com/css3/
div {
animation: bg-color 10s infinite;
-webkit-animation: bg-color 10s infinite;
width: 300px;
height: 300px;
padding: 10px;
}
@-webkit-keyframes bg-color {
  0% {background: yellow;}
	25% {background: orange;}
	50% {background: red;}
	75% {background: orange;}
  100% {background: yellow;}
}
@-moz-keyframes bg-color {
  0% {background: yellow;}
	25% {background: orange;}
	50% {background: red;}
	75% {background: orange;}
  100% {background: yellow;}
}
@keyframes bg-color {
  0% {background: yellow;}
	25% {background: orange;}
	50% {background: red;}
	75% {background: orange;}
  100% {background: yellow;}
}
HTML
<body>
<div>
<img src="img/animation.png" alt="">
</div>
</body>